
Follow these steps using your workspace owner or admin account. Coordinate the handoffs with each notary and the external custodian.
First, agree on shared access and responsibilities with the other roles.
Before you start: you need an active workspace owner or admin account. Confirm that each invited notary joins the intended workspace using their own account.
1. Create the workspace and invite notaries
Create or select the workspace
Click: Settings → Team. If you see No team workspace yet, choose Upgrade to Team Workspace. If you already belong to someone else's team and need your own, the screen can offer Create my workspace instead. Use the existing workspace if it is the one your team intends to protect.
Expected result: a workspace is created for your account and its Team tabs become available. Creating it does not enroll a private journal key or change the journal privacy setting.

Confirm workspace capacity
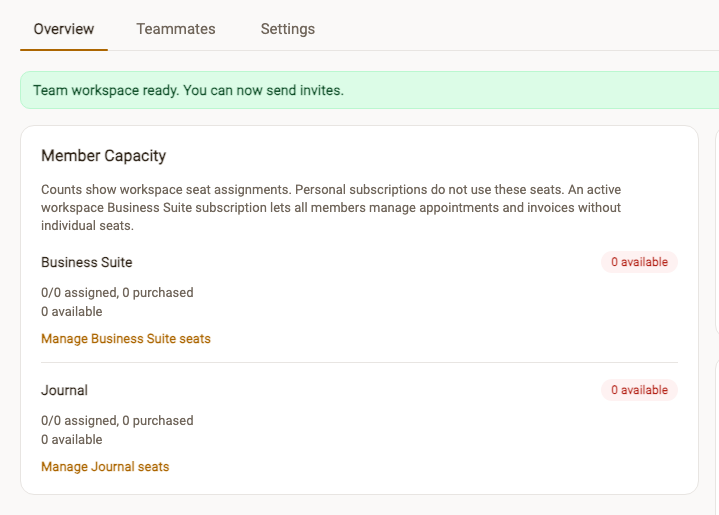
Check: the success message Team workspace ready. You can now send invites. The Overview, Teammates and Settings tabs identify the Team workspace area. Check Member Capacity and coordinate any required Journal seats with your billing owner; creating a workspace is not the same as buying or assigning seats.
Invite each notary
Who does this: the workspace owner sends invitations. If you are an admin without owner access, ask the owner to complete this step.
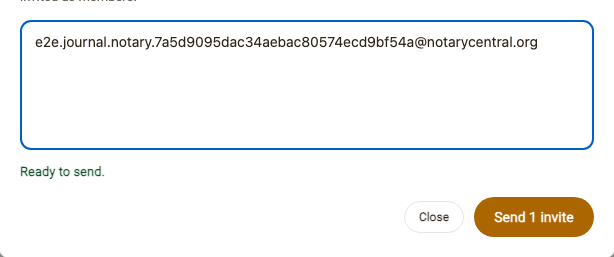
Click: Teammates → + Add teammates. Enter each notary's sign-in email in Teammate email addresses, then choose Send 1 invite (or the displayed count). Use one address for each person's own account, not a shared administrator login. New teammates are invited as members.
Expected result: the invitation is listed as pending until that person accepts. The walkthrough created the real invitation record locally with external email delivery disabled; it does not prove an inbox delivery.
Handoff to the notary: ask each invited person to accept using their own account. Confirm active membership in Teammates before continuing. No installation commands, API credentials or technical configuration need to be shared with notaries.
2. Choose the workspace Vault requirement
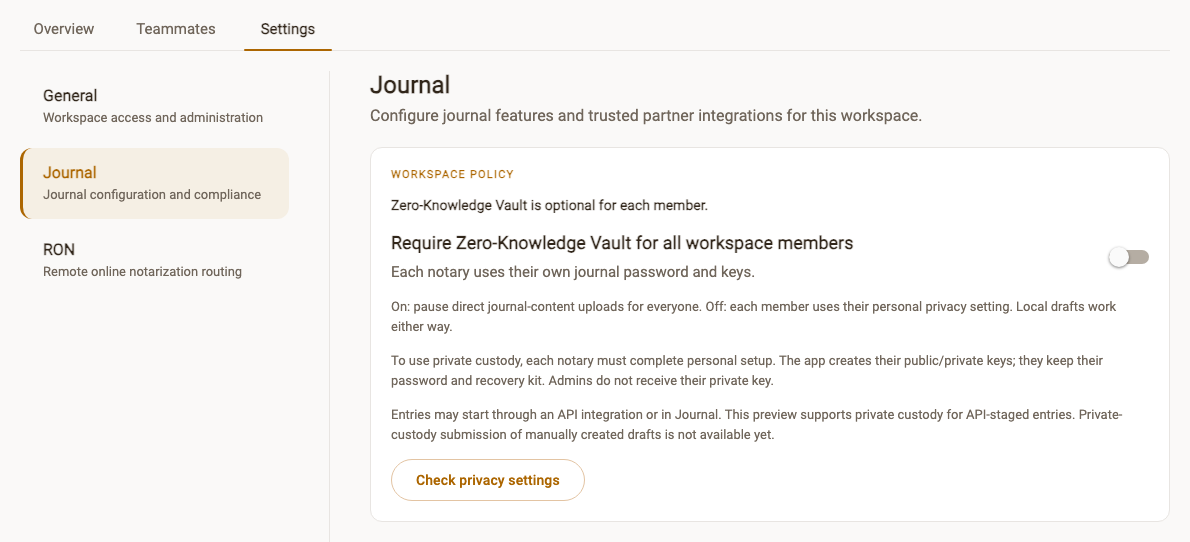
Workspace journal controls live in Settings → Team → Settings → Journal, at /search/settings/team?tab=settings§ion=journal. Confirm the selected workspace is the team you intend to manage. Journal compliance rules apply independently of the Vault privacy preference.
Open Team Journal settings
In Team, choose the Settings tab, then the Journal section. The image below shows those selections and the workspace Vault control. Owners and admins can also reach this screen from their personal Journal privacy page using Open Team Journal settings after selecting the workspace.
Confirm the workspace and saved policy
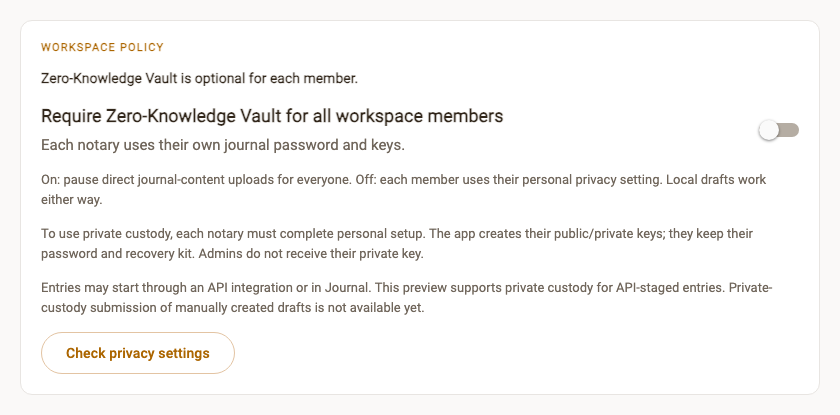
Check: the workspace name, Journal section and Require Vault protection for all workspace members card. The separate Federated journal integration card controls approved API client access; it is not the private key enrollment control or a switch for applying legal rules.
Save and verify the requirement
Setting status:
- On: Vault protection is required for all members.
- Off: Vault protection is optional for each member.
- If it cannot load: Unable to load the workspace’s Vault protection setting. This does not mean the setting is off.
Admin action: use the switch in Require Vault protection for all workspace members and wait for Vault protection is required for all members. If the saved result is uncertain, choose Check privacy settings. On pauses direct journal-content uploads for everyone; off uses each member’s personal setting.
Expected result: each notary must complete their own private journal setup. The app creates their public/private keys; each notary keeps their password and recovery kit. Admins do not receive those secrets. This switch does not create keys or protect earlier entries.
Entries may start through an API integration or directly in Journal. This preview supports the protected API-staged workflow. Directly created entries can be saved as local drafts, but submitting those drafts into private custody is not available yet. Do not enable sending signer details to work around that missing workflow.
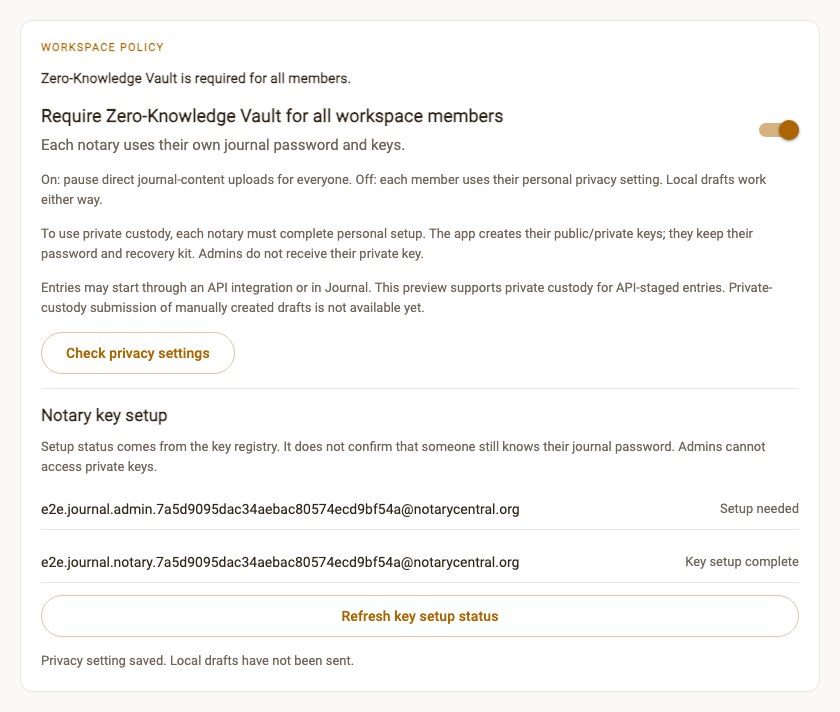
Handoff to the notary: send each member to private journal setup. Admins who also act as notaries complete that personal setup themselves.
3. Approve integration access and the portal address
Who does this: an active workspace owner or admin coordinates with the external custodian's integration administrator. A notary's personal login and journal password are not integration credentials. Use one named client for the intended external custodian and workspace so its access and portal can be managed when an admin changes.
Complete these account settings with the external custodian's integration administrator. Then hand over to the external custodian instructions.
Confirm workspace API approval
Open Menu → Settings → API credentials. Under Credential workspace, select your team's workspace, rather than Personal / no workspace.
Expected result: API access is approved for this workspace. Current owners and admins can manage its credentials. If access has not been approved, contact NotaryCentral support with the workspace ID. Do not create a different personal client as a workaround. Personal API approval does not approve a workspace, and a workspace integration is not tied to its original creator remaining on the team.
Enable the journal integration
Return to Team → Settings → Journal. In Federated journal integration, turn the integration on and wait for Enabled. This permits the approved integration to create metadata-only journal records, submit staging commitments and retrieve signed evidence. It does not give the integration the notary's personal Finalize authority.
This is separate from Require Vault protection for all workspace members. The Vault setting governs member privacy/key setup; the integration control governs API access. Changing either one does not generate a key or protect old entries.
Create and securely share the integration credentials
Return to API credentials with the same workspace selected.
- Give Credential name a recognizable name for the external custodian and workspace.
- Select the permissions your external custodian needs for this protected workflow: Create federated journal records, Commit federated journal records, and Read federated journal evidence. The current Commit permission includes protection binding and staging commitments; its label is not permission to finalize a notary's company-managed entry.
- Choose Generate client ID and secret once.
- Copy the client ID and the one-time secret into the external custodian's approved secrets manager. Supply them only to that authorized integration administrator through a secure channel. Do not paste a client secret into this guide, an entry, a screenshot or a support ticket.
- Keep using that client for the integration. Use Rotate secret only when replacing its credential is intended, and coordinate the change with the external custodian.
Expected result: the client is listed under Existing clients for the selected workspace. Current authorized owners/admins can manage it even if the administrator who created it later leaves. Workspace approval, the integration and the client must remain enabled.
Approve the client’s portal address
In Existing clients, find the intended external custodian's client and set the approved origin for your company's portal. Enter the trusted website address, then save the setting.
Labels in existing app versions: the field is named Approved customer portal origin, and its action is Save customer portal origin. Here, the portal belongs to your company; it is not the signer's personal account.
Use an origin such as https://portal.example.com: the scheme, hostname and optional port only. Do not include a record path, a trailing sign-in query, a password or a wildcard. Your external custodian supplies individual record links beneath that origin when it stages entries. Different external custodians can have different approved origins on their own workspace clients.
Expected result: a confirmation that the portal origin was saved and existing entries keep their original binding. Refresh the page, reselect the workspace and confirm the saved value. Check the address with the external custodian through your established channel before approving it.
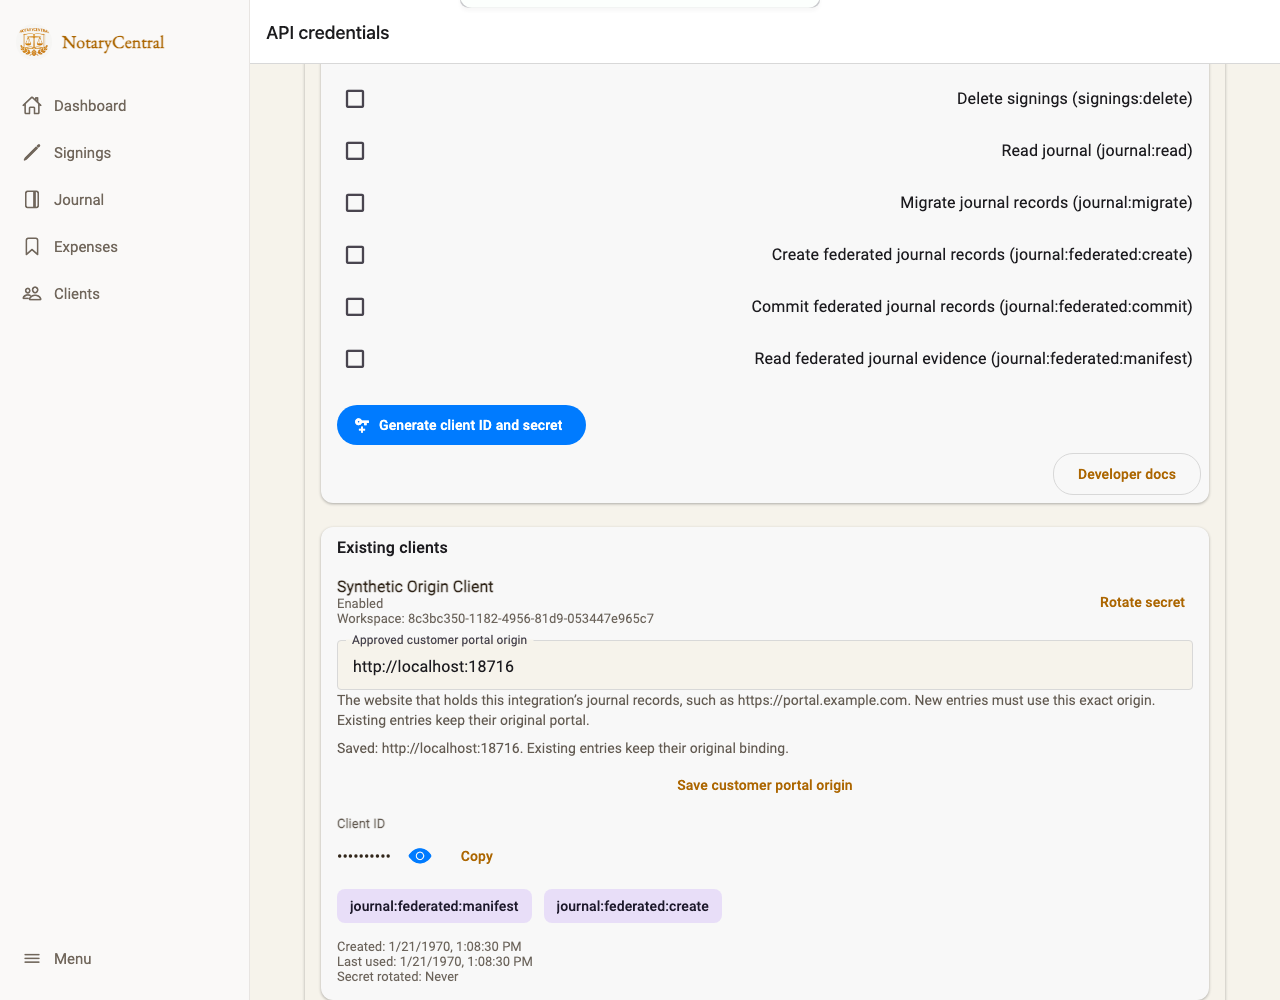
New entries must use this exact origin—including its port. A missing approval stops creation; a record URL on another origin is rejected. The protected viewer obtains the approved origin with the authenticated entry binding. You do not rebuild a separate viewer for every company’s URL.
Changing this setting applies to new entries. It does not redirect earlier records, change a finalized entry's URL or make old unbound records trusted. Coordinate portal moves with the external custodian so historical records remain retrievable. If the external custodian's portal address unexpectedly changes, stop and confirm it before approving anything.
4. Confirm each notary has enrolled a key
Give each notary time to complete private setup themselves, on a trusted device. With workspace enforcement on, Continue setup handles the required account steps and then opens the isolated viewer. Otherwise use Journal → More → My Vault keys → Create new key, then Open secure setup after account verification. Follow the notary key setup steps.
Explain these rules during onboarding:
- The journal password is separate from the NotaryCentral account password and the company’s sign-in.
- Each notary creates and registers their own protection key before the company creates an encrypted copy for them.
- Each notary privately saves their own recovery kit. Do not ask them to upload it to a shared team folder or send it in chat.
- An administrator can help with workspace membership and external custodian coordination, but cannot substitute their own password to unlock another notary's copy.
When the workspace requirement is on, owners and admins can open Team → Settings → Journal → Notary key setup. The list shows active notary members as Setup needed or Key setup complete. It refreshes after registration; use Refresh key setup status to check again. Status does not prove the notary still knows their password and does not expose their private key. Ordinary members cannot read this admin roster.
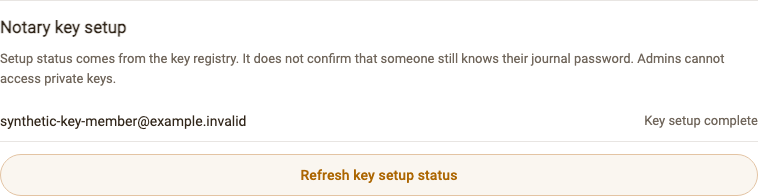
Check enrollment and share only public encryption material
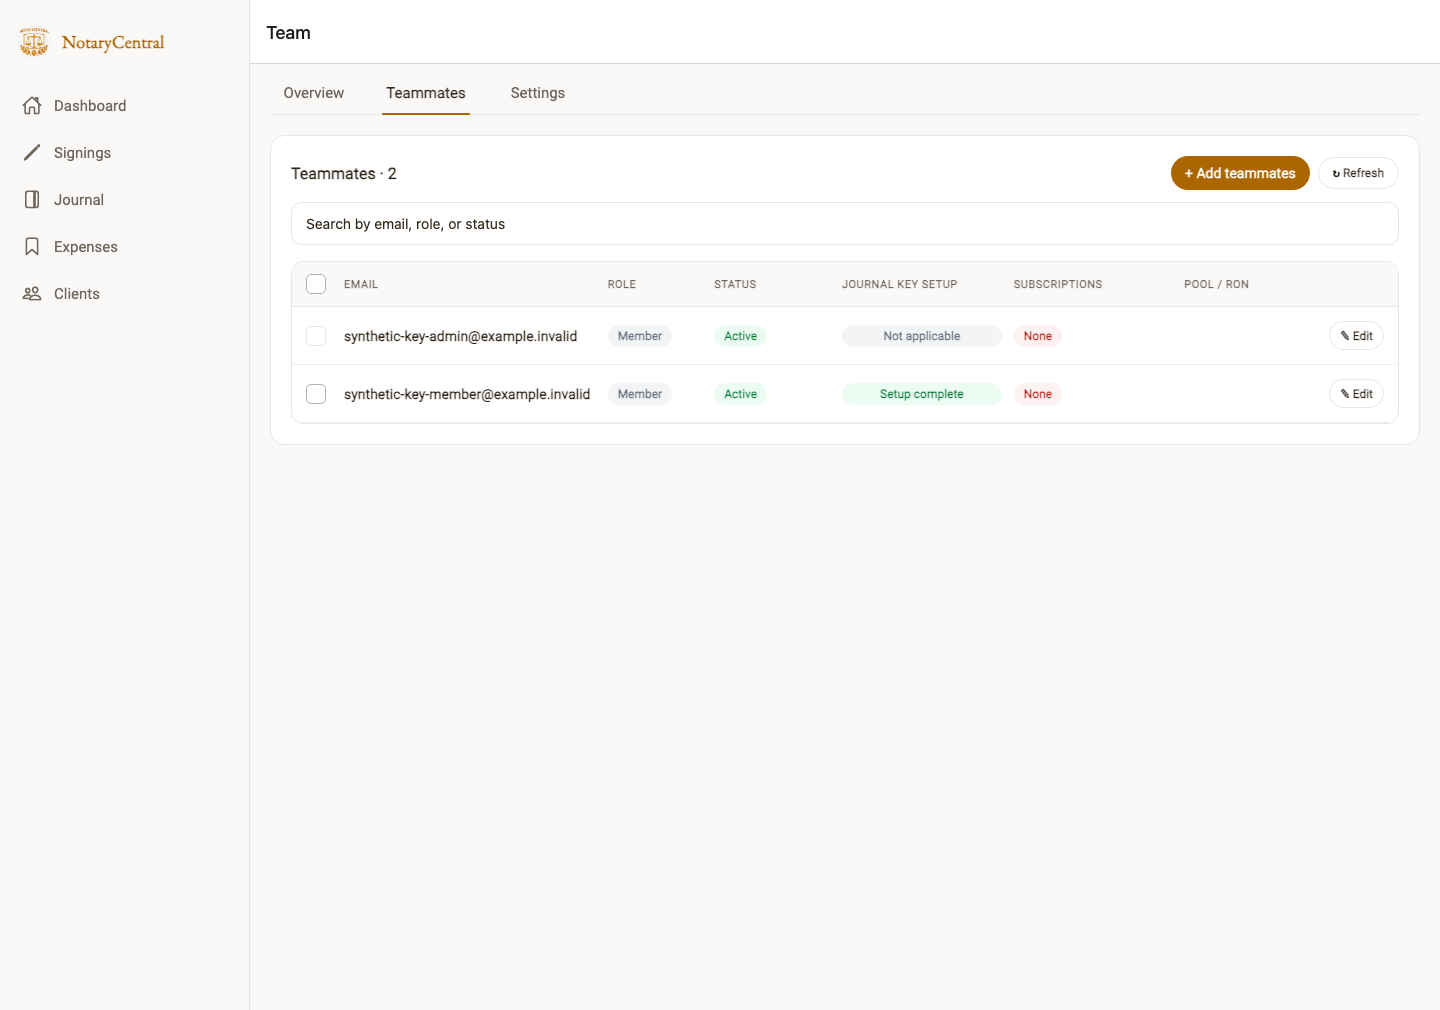
With the workspace requirement enabled, open Team → Teammates. Journal key setup has its own column:
- Setup complete: the registry confirms an enrolled usable key. This does not prove the notary still knows the password.
- Setup needed: the applicable notary needs personal setup.
- Checking… or Unavailable: the status is not confirmed; refresh rather than treating it as either complete or missing.
- Pending invitation, Not active or Not applicable: address that membership status first; these are not successful key-enrollment confirmations.
The column is shown when the workspace requirement is confirmed on. Its absence does not prove every member is configured. On a narrow screen, scroll the teammate table horizontally if needed.
To inspect the public key, click that teammate's row to open Teammate Details. In the details section, find the one-line Public journal encryption key summary, above Remove from workspace. Choose See more, then Copy public key. Wait for Public key copied. Use Refresh public key to check again before sharing it with the authorized external custodian. See less collapses the details.

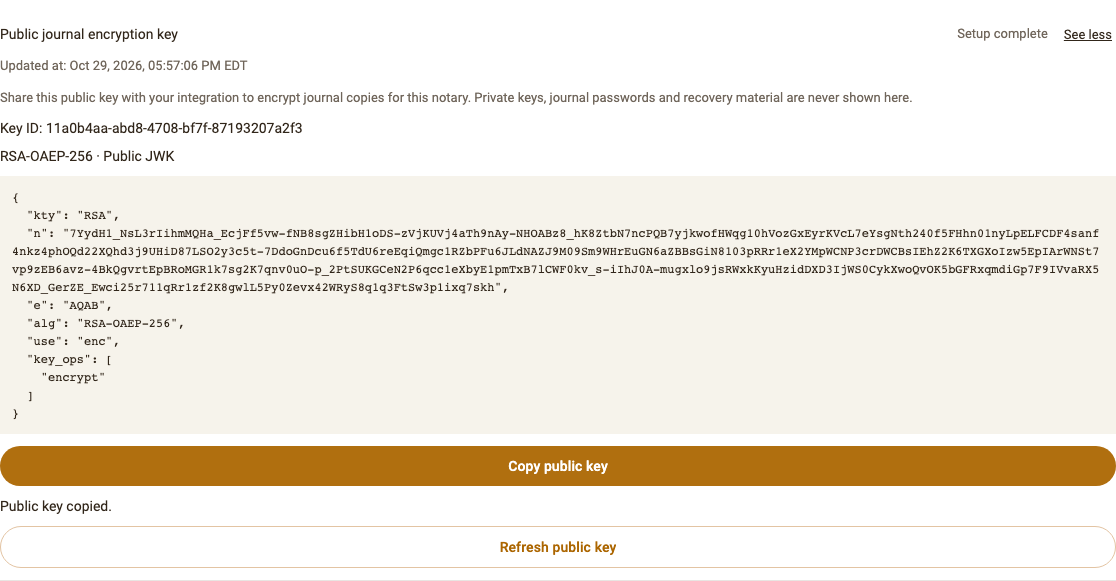
Ask the notary to confirm Protection key registered and successful reopening of a synthetic practice entry. A confirmation is enough; do not request a password, recovery secret, private key or a screenshot of the recovery file.
5. Coordinate a practice entry and check readiness
Admins coordinate correct assignments, commission selection, external custodian access and missing-record enquiries. Notaries inspect their assigned records and choose Finalize or Reject. An administrator's policy access does not confer personal finalization authority or access to decrypted journal contents.
Ask the external custodian to stage a synthetic practice entry after key enrollment is confirmed. Have the notary finalize and reopen it, then ask the external custodian to confirm the PDF and evidence package reached the agreed storage destination.
Admin readiness checklist
- Confirm release availability, trusted external custodian and viewer addresses, workspace membership and each notary's commission.
- Choose and communicate the workspace Vault requirement, including its limits for earlier records.
- Confirm workspace API approval, enable the integration and securely supply the external custodian's credentials.
- Save and read back the approved portal origin on the correct workspace client.
- Confirm each notary's key enrollment and private recovery-kit storage; collect only confirmation and share only authorized public encryption material.
- Complete a synthetic practice entry through finalization and reopening, then confirm PDF storage with the external custodian and record the responsible operator.
6. Resolve workspace and access problems
Controls or the protected workflow are missing
Confirm release availability with your administrator or external custodian. Confirm the correct account, active workspace and assigned commission. Use the web app for this preview. Do not allow sending journal contents just to make a entry staged by the external custodian appear.
API access or the portal address cannot be saved
Reselect the intended workspace in API credentials. Not approved means the workspace needs API approval; it is not fixed by granting a different admin personal API access. An Enabled integration and an approved client are separate prerequisites.
A 404 for the portal setting means the app and backend are not providing the same capability yet. A 409 while creating a company-managed entry can mean its client has no approved portal origin. A 403 may mean insufficient workspace authority or a mismatched record origin. Have the integration administrator inspect the exact safe error message; do not infer the cause from the status number alone.
For an HTTPS-required error in a local practice environment, the environment administrator must confirm the local-only configuration. Never switch a production company portal to HTTP to get past validation. Changing an origin will not repair a legacy entry without a verified origin binding or move a historical record automatically.
For key setup or unlock problems, direct the notary to personal troubleshooting. For staging or archival failures, involve the external custodian.