
For entries you create yourself, start with the Vault protection overview. Use Journal → More → My Vault keys to turn protection on or off and review key names and registration dates. After account verification, choose Open secure setup to create a key.
Working independently? Start at Create your private journal key; you do not need a workspace invitation. If you are joining a team, follow the invitation step first. External-custodian steps apply only to entries supplied through that integration. Keep your journal password and recovery material private.
1. Accept your workspace invitation
Notary action: open the invitation link and sign in with the same email it was sent to. Create the account first if prompted. Do not accept under the administrator's account.
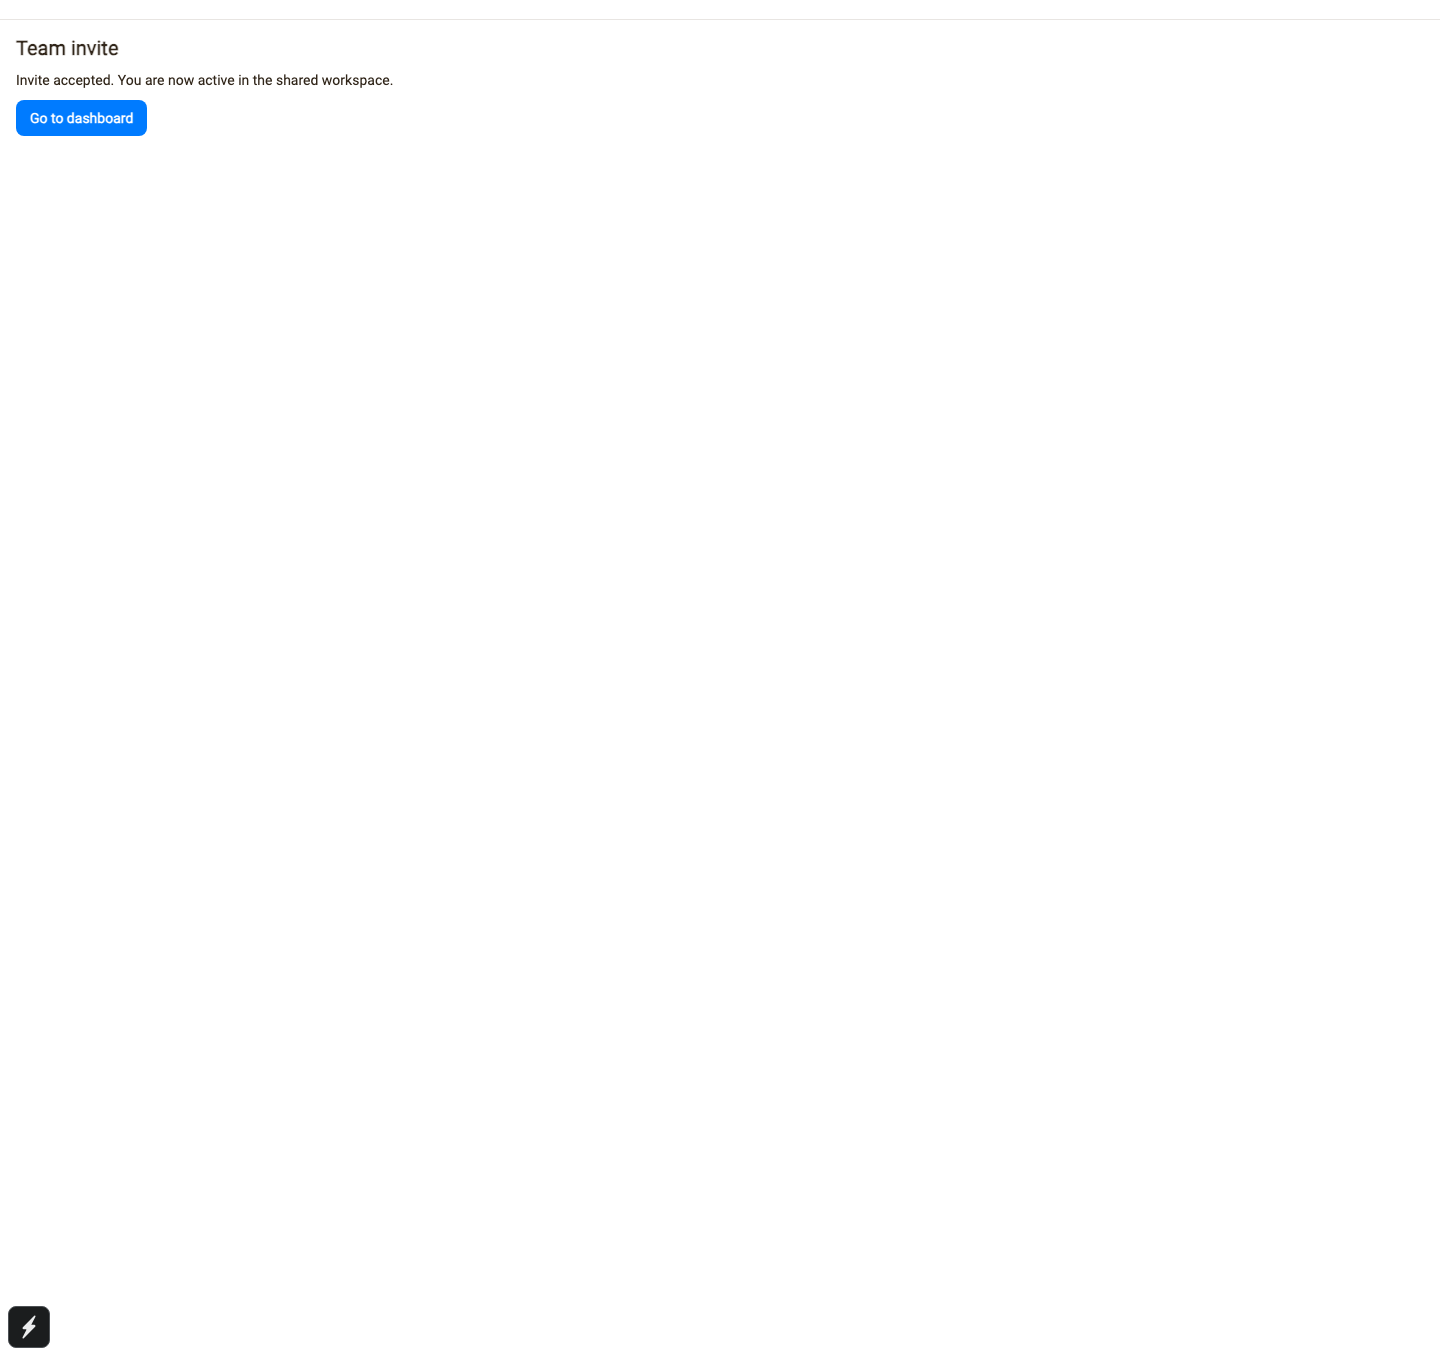
Expected result: Invite accepted. You are now active in the shared workspace. The admin can confirm active membership in Teammates. Membership does not grant access to someone else's private journal password or complete protected entries.
2. Create your private journal key
Watch: create your journal key and save it privately
A 1 minute 51 second walkthrough of personal key setup, a unique journal password and saving the downloaded recovery kit in 1Password. NotaryCentral screens use synthetic accounts; 1Password screens are illustrative examples. No real secrets are shown.
Before you start: use the web app on a trusted device, sign in as yourself, select your own commission, and have a private place ready for the recovery kit. This preview's enrollment and isolated viewer flow were verified on the web; do not assume the same setup is available in a native mobile app.
Complete account verification when prompted
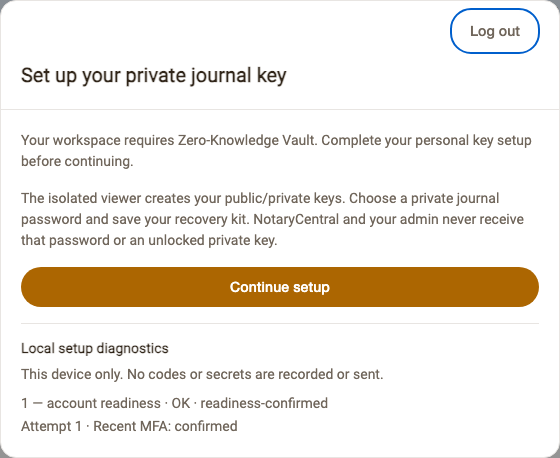
When the server confirms that an active workspace requires the Vault and you have no usable enrolled key, Set up your private journal key appears before you can continue in the app. Choose Continue setup; the app checks account verification and guides you to the isolated viewer. Log out is a quiet text action in the top-right of the dialog header, away from Continue setup and Verify and continue. Outside clicks, Escape and changing pages do not dismiss a confirmed requirement. A notary who is also an admin completes personal setup too.
There is one setup action; you do not choose between account security and journal keys. If MFA is already configured, the flow asks you to Verify your account when needed; it should not ask you to enroll a new authenticator. An unknown account-factor status does not count as missing MFA.
- Choose Continue setup.
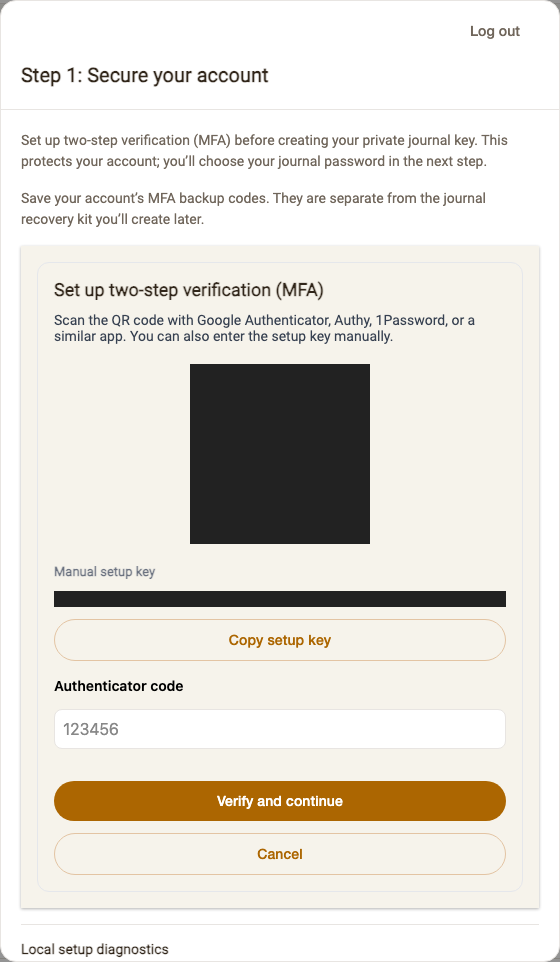
- If Step 1: Secure your account appears, set up two-step verification (MFA) before creating your private journal key. This protects your account; you’ll choose your journal password in the next step. Save your account’s MFA backup codes separately from the journal recovery kit you’ll create later.
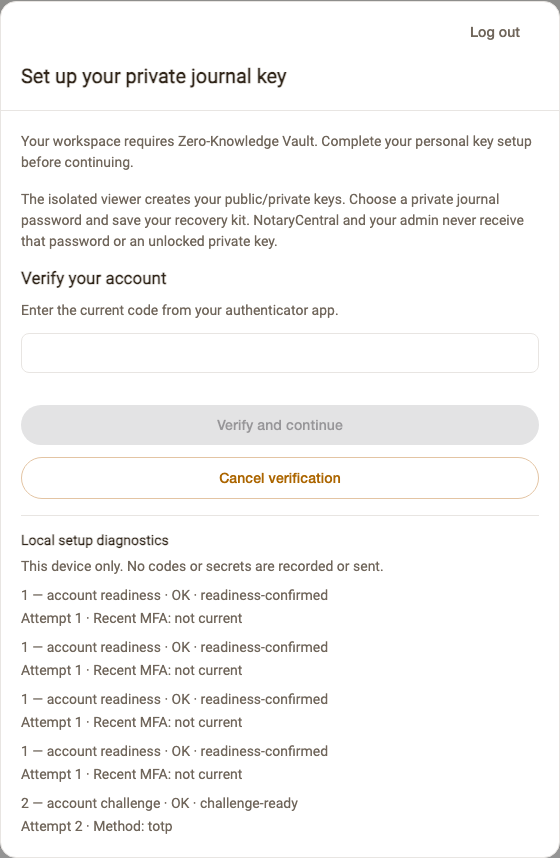
- If recent account verification is needed, enter the requested account password or verification code and choose Verify and continue. If it is already current, this step is skipped. Cancelling verification returns to the required-setup dialog.
- The isolated viewer opens for your private journal password and recovery kit. Complete the key enrollment there; only server-confirmed registration completes setup.
Loading or an unavailable key-status lookup does not show the required-setup modal and does not mean setup is complete. The separate privacy controls still govern sending journal data. If the app knows you need setup but cannot check account verification, it shows a clear connection or backend-version message inside the dialog; it does not treat that failure as successful verification.
Open private journal setup
Click: if required setup is shown, choose Continue setup in that modal and complete any prompted account-verification step. Otherwise open Journal → More → My Vault keys → Create new key and complete account verification when prompted. Both open the isolated setup viewer. This is separate from the workspace policy screen. Confirm you are in your own account and the right commission.
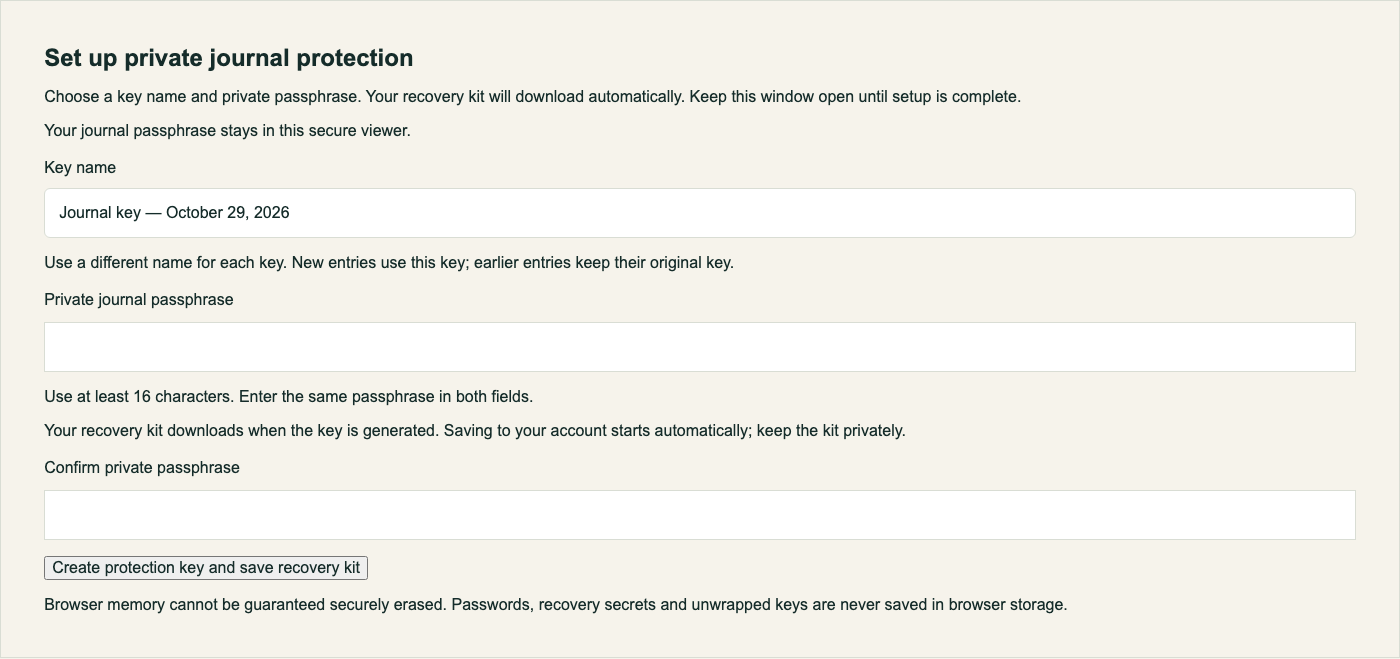
Choose your private journal password
In the isolated viewer: review the prefilled Key name, then enter Private journal passphrase and Confirm private passphrase. Use a strong, unique passphrase of at least 16 characters. Then choose Create protection key and save recovery kit. If a field is empty, too short or does not match, the button explains the problem on click; correct the highlighted field and try again. Do not generate another key merely because a save is still pending.
What happens: the viewer automatically generates your public/private key pair on your device. You do not type, paste or generate key commands yourself. The password protects the private key locally. Your external custodian receives the public key so it can encrypt your journal copy without learning your password. Only password-protected private-key boxes are registered; your raw private key and password are not sent to NC or the company.
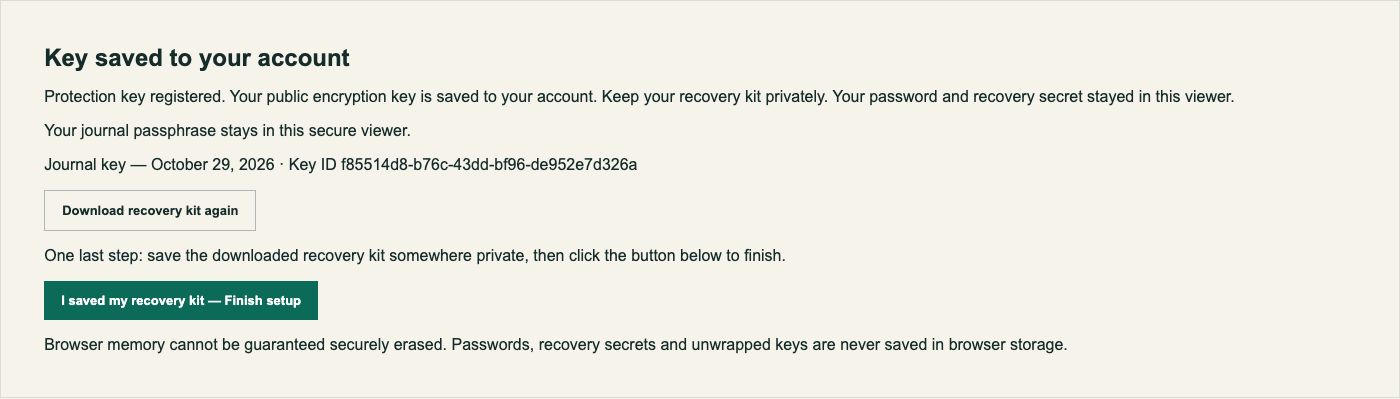
Save your recovery material privately
After generation: your public encryption key is saved to your account automatically. Wait for Protection key registered before treating setup as complete. Privately store the downloaded recovery kit, then choose I saved my recovery kit — Finish setup. If saving is not confirmed, choose Retry saving same key; do not generate a replacement key.
Expected result: you see a public key identifier and the confirmed account-save message. That identifier is safe public information; it is not your private key. Never share the recovery kit, recovery secret, passphrase or raw private key with an admin or support agent. This guide deliberately does not show the recovery file's contents.
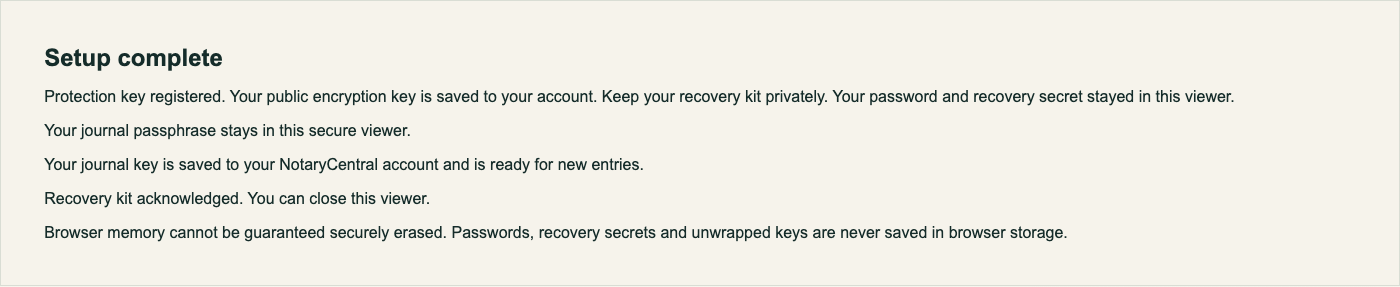
Confirm your key was registered
Check: Protection key registered. This is the confirmation that your key is enrolled; a workspace switch being on is not that confirmation. Your external custodian can now use the registered public key for new protected copies assigned to you.
Expected outcome: your external custodian can create a protected copy using your registered public key without knowing your passphrase. If no key is enrolled, protected creation must stop; an unprotected copy is not an acceptable fallback. Old plaintext records are not retroactively protected by this setup.
Walkthrough: key registered
Handoff to the external custodian: confirm that setup is complete and wait for your assigned practice draft. The external custodian needs your registered public encryption key; it never needs your journal password or recovery kit. Enrollment alone does not create a draft.
3. Review and finalize or reject drafts
When assigned drafts need review, Journal entries need your review. appears on both Dashboard and Journal. Choose Review drafts to open the matching commission in Drafts. The old always-visible company-managed approvals shortcut is removed. A missing banner is not proof there are no drafts when the service is unavailable; you can still open Drafts through Journal navigation.
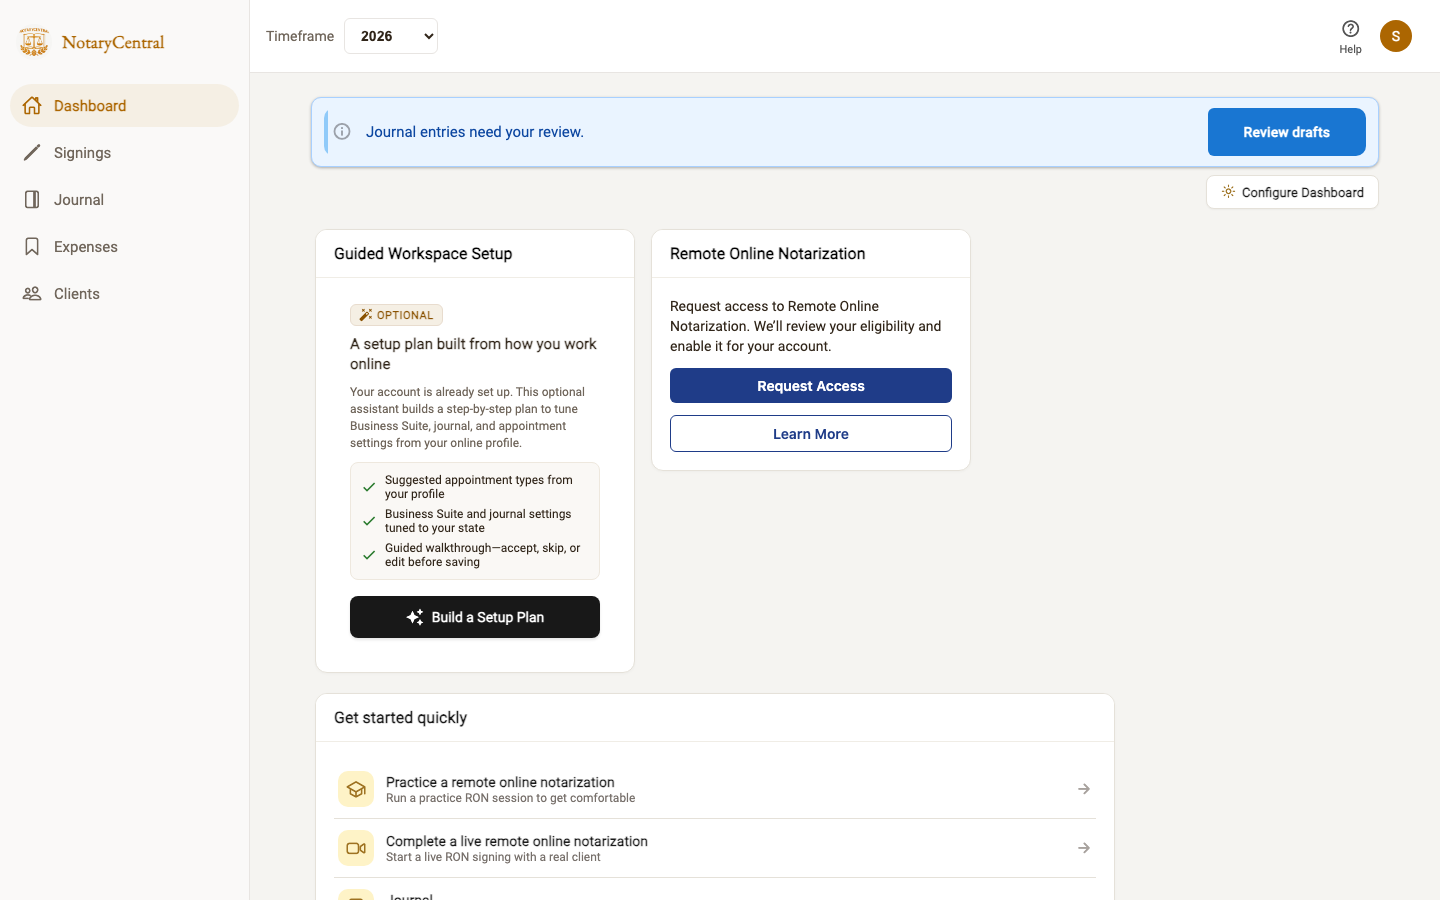
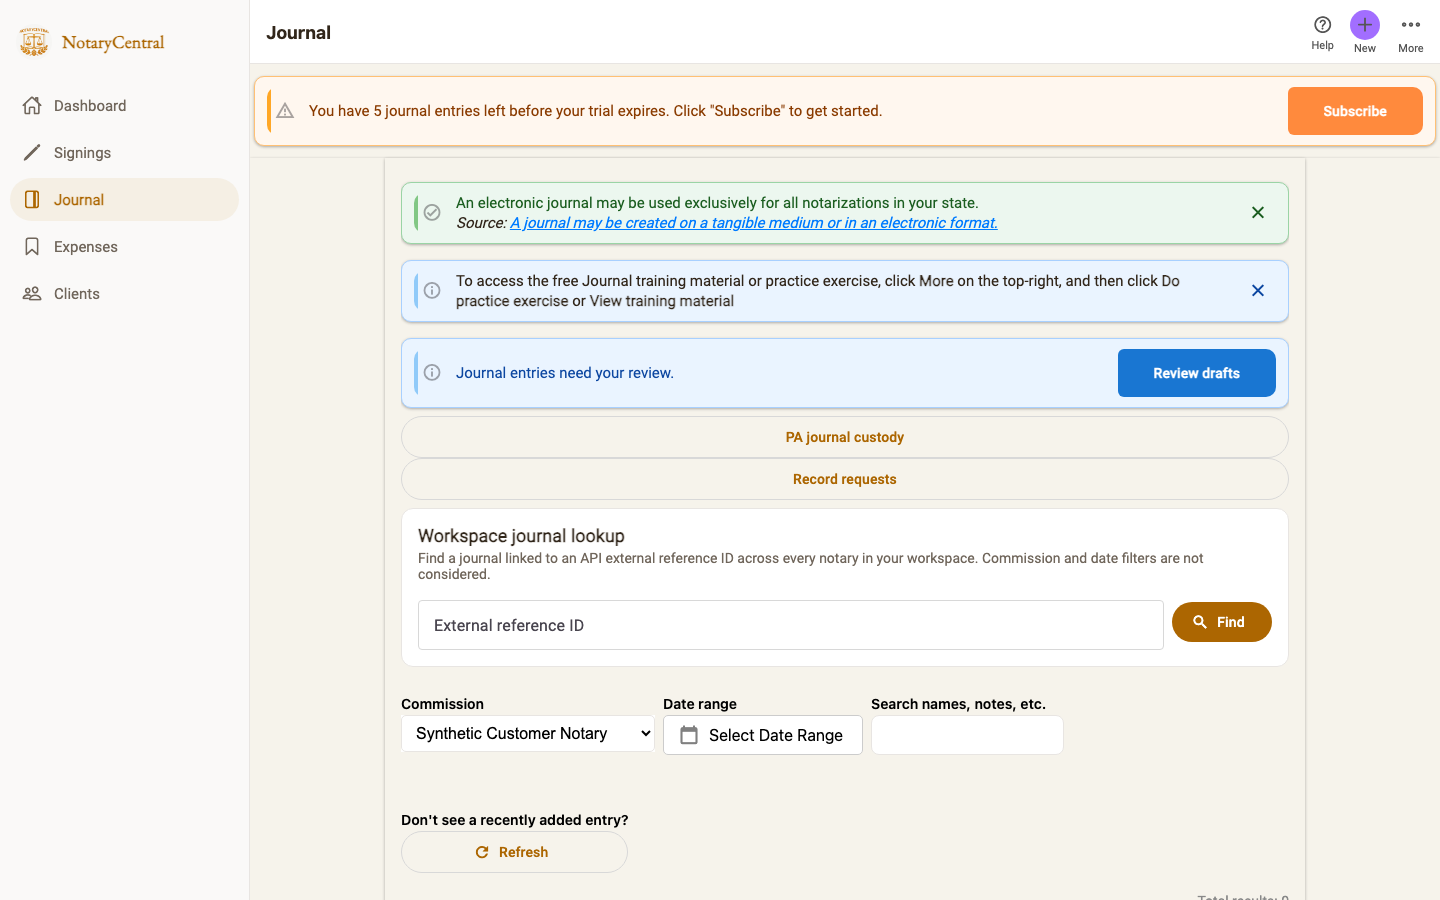
Journal drafts lists “Entries submitted by your organization for you to review and finalize or reject.” Other personal drafts retain their existing creation flow.
Before you finalize: connect to the service, select the right commission and confirm the expected company/order reference. Choose Refresh journal drafts if an expected entry is missing.
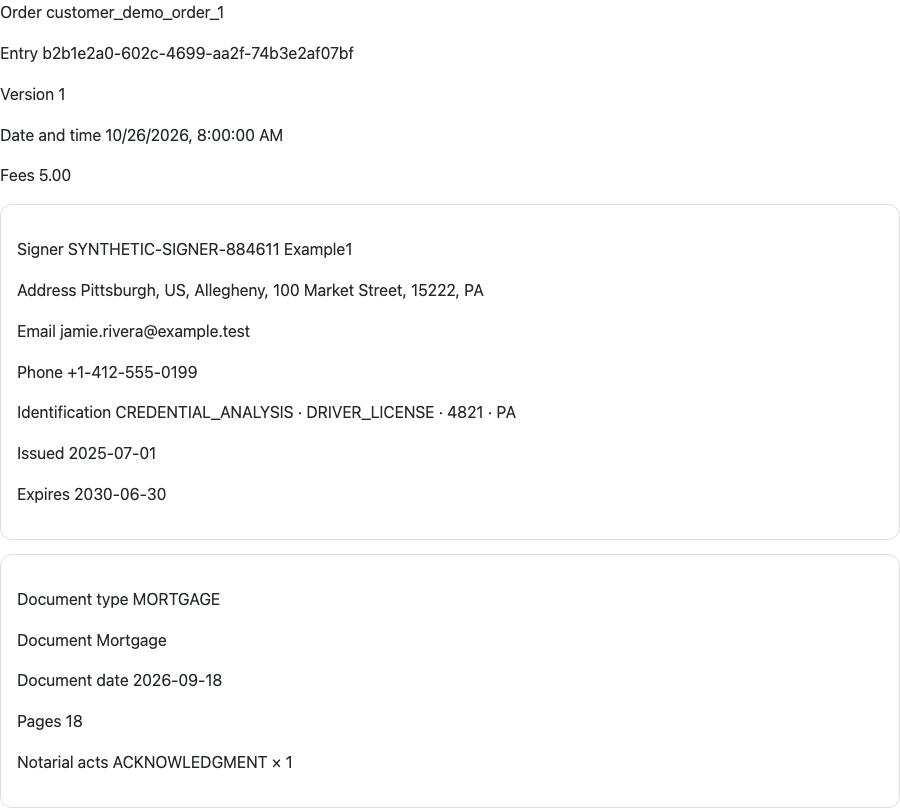
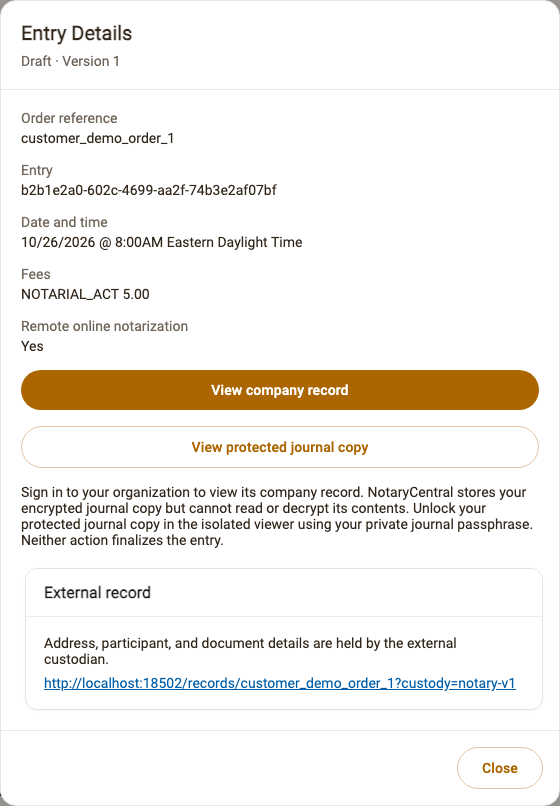
Use Entry Details when you want to inspect an entry before making your decision. View company record opens the external custodian’s transaction; sign in there if asked. View protected journal copy opens the isolated viewer. For this draft preview, choose Load encrypted entry from custodian, complete the external custodian’s sign-in if prompted, then return to the viewer. Enter your private journal passphrase and choose Unlock complete entry. These viewing actions are optional and do not finalize an entry.
Check that the intended references and versions are selected in Drafts before choosing Finalize. Viewing a company transaction does not itself verify the protected snapshot, and a cryptographic check does not establish that the recorded facts are accurate.
Make your decision in NotaryCentral
Your decision happens in Drafts, in your personal NotaryCentral session. Finalize selected is your explicit authorization for the exact selected entries and versions. There is no separate Approved business state.
Finalize one entry or a batch
- Select one entry, or use Select All for eligible entries currently shown for the selected commission. The scope is at most 100 shown entries; it does not select hidden entries on other pages or commissions.
- Check the selected count, then choose Finalize selected (N). This single action finalizes the selected entries. If Verify your account appears, complete the required account verification; the same Finalize action then continues automatically. No protected-viewer unlock, review-window button, or second Finalize confirmation is required.
- Keep Drafts open until results appear. Successfully finalized entries leave actionable Drafts. Unselected entries and entries that fail finalization remain drafts. A batch can have partial success; check each result.
If your connection drops, refresh and inspect each entry's current result before retrying. Use recovery/retry controls for the same entry rather than creating duplicates. A pending organization acknowledgment is separate from finalization. Your organization’s configured integration retrieves the signed receipt, verifies it against its own historical data, generates the complete PDF and saves the PDF/evidence package automatically, then acknowledges archival to NotaryCentral. Drafts updates this status while open; refresh recovers the latest status later. No notary popup, extra download action or journal passphrase is required for company PDF archival.
Reject a draft
Select the intended entries and choose Reject selected (N). Check the list in Reject N entries?, choose an appropriate provided reason and confirm Reject N entries. Use the bounded reason choices; do not send signer details as a rejection explanation to support.
Rejection retains the original record and audit history. It is not a way to delete or void an already finalized entry. Rejected entries leave actionable Drafts; an unselected entry is still a draft, not rejected.
After finalization: the external custodian's worker prepares and stores the company PDF automatically. You may close the app once finalization succeeds. You do not need to unlock your private copy to trigger that storage. For a pending company PDF, contact the external custodian; do not finalize again.
4. Reopen, export and lock your journal copy
- Open the main Journal page,
/journal(not/journals). Choose your commission and the appropriate date range. - Find the finalized entry and choose its More action. Confirm the reference and date. The NC detail page remains a metadata view, not the complete personal record.
- Choose View or download complete entry. If asked, enter the current code from your authenticator app (or the account verification method named on the screen). The secure viewer receives your encrypted notary copy and signed evidence from NotaryCentral automatically; no company login is needed.
- Enter your private journal passphrase and choose Unlock complete entry. Check the verified result and the matching entry/version before using the content.
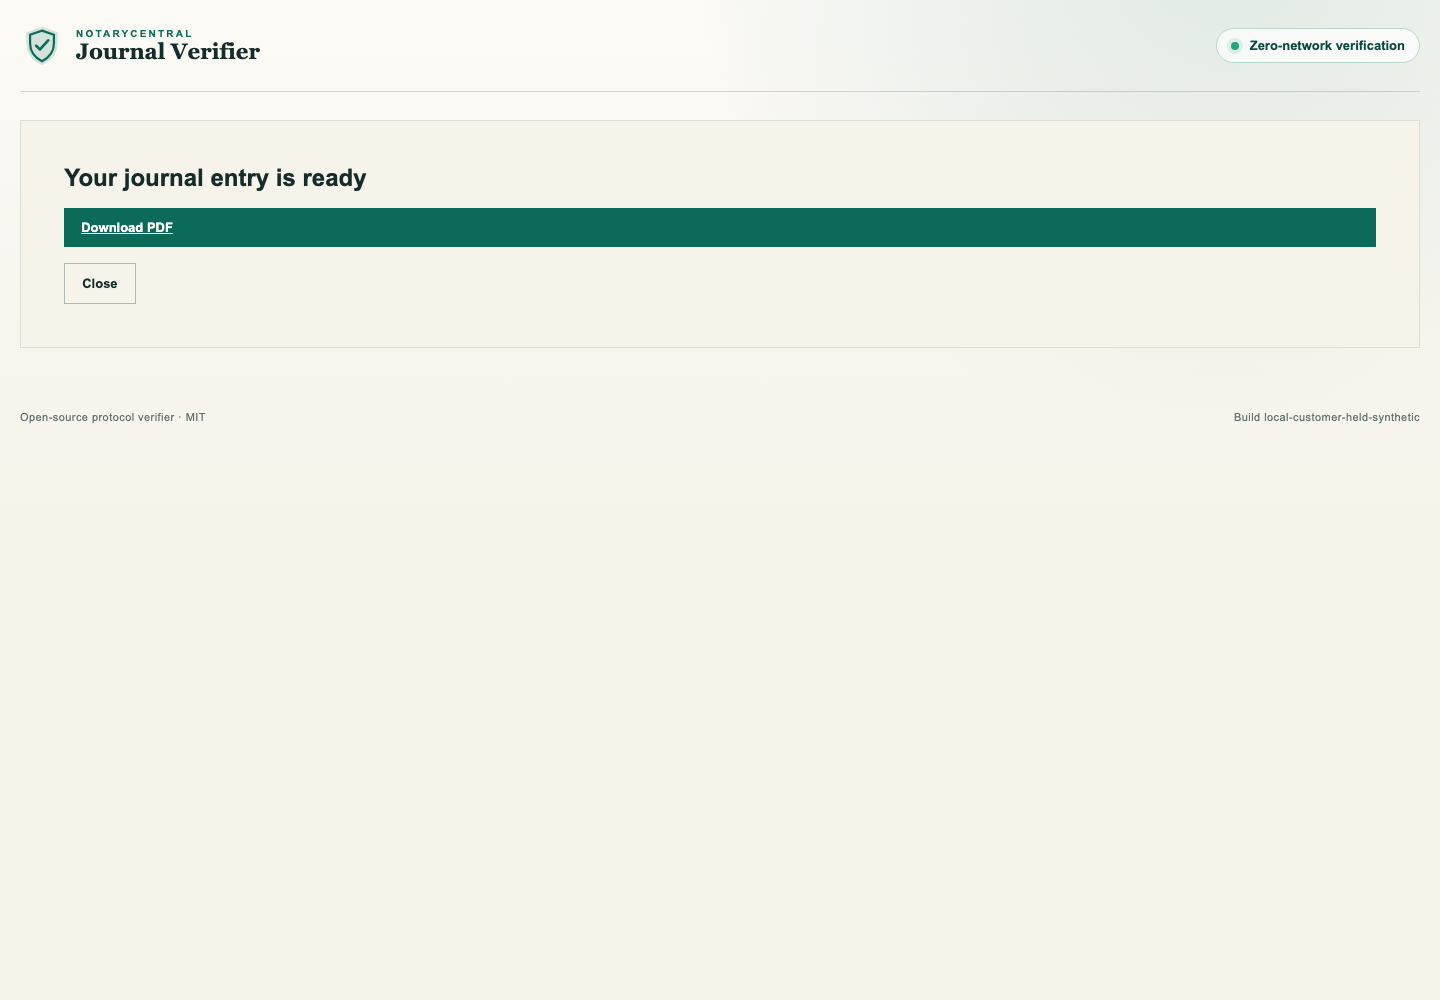
- Wait for Your journal entry is ready, then choose Download PDF. Open the downloaded PDF to review the complete entry. The viewer prepares this PDF automatically; a signed receipt alone is not the complete entry.
- When finished, choose Close to clear the decrypted content and prepared download and close the viewer. Reopen it from your own entry when needed. Changing the NotaryCentral account also ends the protected viewer context.
Expected outcome: finalized entries no longer appear as actionable Drafts and can be opened from Journal. Your encrypted notary copy is stored independently in NotaryCentral before finalization. Reopening it requires your personal account and private journal passphrase, even after company access ends; it does not contact the original company. Local exports remain your responsibility after download.
Walkthrough image: complete journal PDF ready to download
Lock the viewer when finished
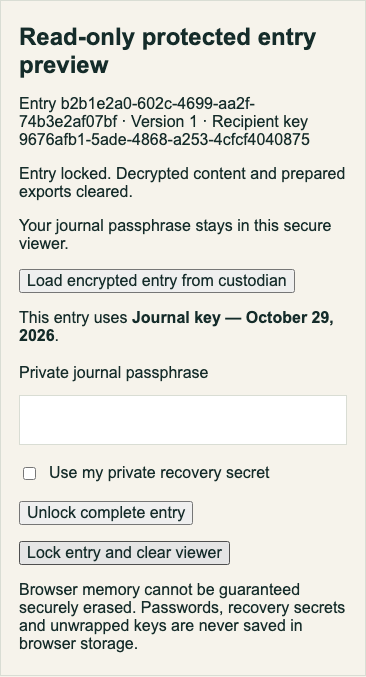
For a draft preview, choose Lock entry and clear viewer. For a finalized journal copy, choose Close. Close sensitive windows and protect any files you downloaded. Locking removes the viewer's decrypted results and revokes its prepared export links. It does not delete an already downloaded PDF, erase copies you shared or guarantee secure erasure of browser memory. Follow your organization's authorized retention and device-security practices for exported files.
Walkthrough image: entry relocked
5. Manage recovery and personal privacy
Forgot your journal password?
Use your privately saved recovery material only in the trusted isolated viewer. The viewer offers Use my private recovery secret. Keep it private just as you would the journal passphrase; do not paste it into NC, the company page, email or support chat.
If you have lost both the passphrase and the private recovery material, stop and ask your administrator or external custodian about the available record-access options. An administrator or support agent cannot recover your private decryption secret or bypass it. Resetting your account password, changing workspace policy or enrolling a new key does not unlock copies encrypted for the old key. Do not discard older recovery material on the assumption that replacement enrollment migrates old records.
Changing a password or replacing a key
Changing a journal password and creating a new key pair are different actions. A password change would protect the same private key with a new password; a new key pair is used for new protected copies. It does not unlock entries encrypted for an older key. Keep historical keys and their recovery material.
This preview has not verified a complete self-service password-change or key-rotation management journey for company-managed entries. Do not repeat first-time setup as a password-reset shortcut. Ask your external custodian which supported recovery or rotation procedure applies before making a change; never send them the secret. The admin public-key screen is a status/copy screen, not a private-key editor.
Check your personal journal privacy setting
After required key setup is complete, for the personal preference open Settings → Security using the Security row's pencil icon, then Journal privacy settings. Select your workspace context to see whether its requirement manages your personal control. Workspace editing is available to owners/admins through Open Team Journal settings; ordinary members see the managed status instead. Your journal privacy cannot override an active workspace requirement.
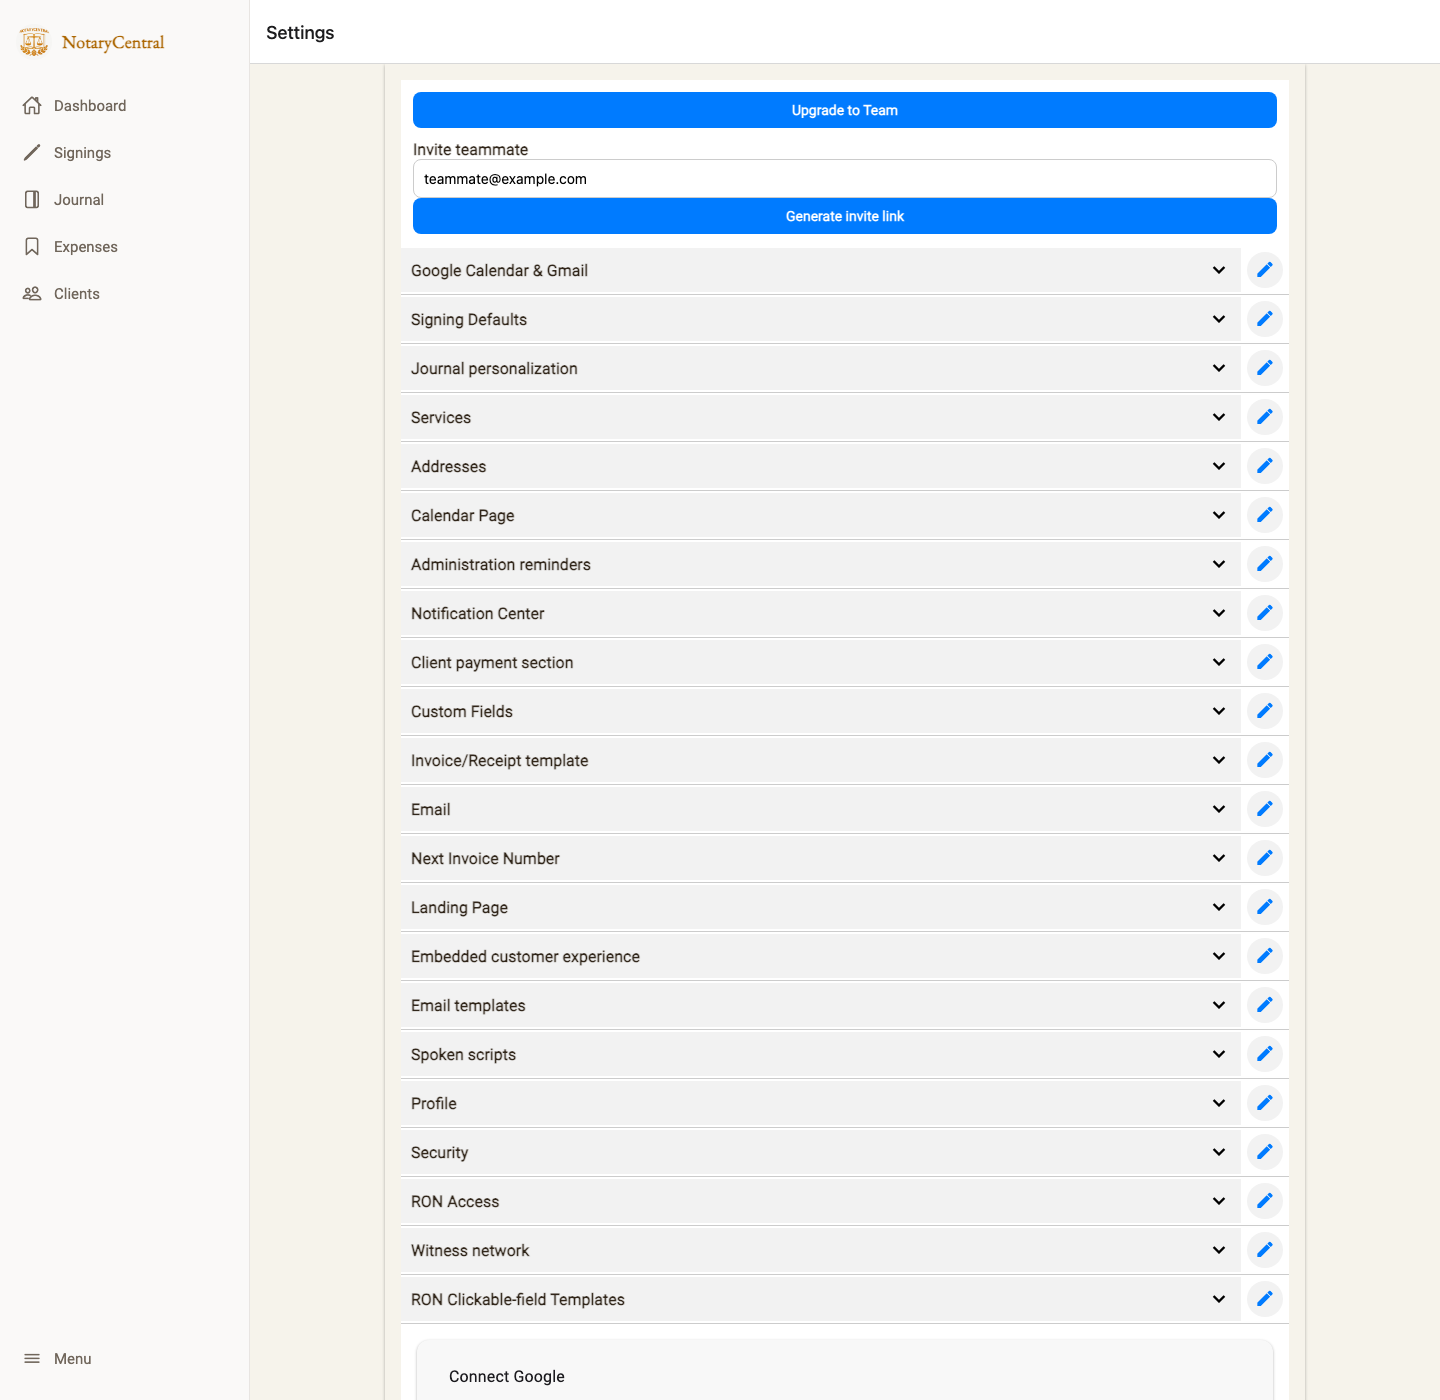

Only active owners or admins can change the workspace requirement. Removing it preserves each member's personal privacy setting. A saved policy is not evidence that every notary has enrolled a key or that older records are protected.
If protection is turned off: standard journal sync does not restart automatically. Allow sending journal contents for this session is an explicit decision to send journal contents to NC; existing queues may then upload. Do not use it to work around missing protected drafts. Refreshes, account changes, sign-out and policy changes pause sync again. Leave sync paused if policy cannot be verified.
The Vault preference controls standard journal sync and optional diagnostics. You can still create and edit local drafts; this preference does not provide a manual path for converting those drafts into protected company-managed entries. It does not create your journal protection key, encrypt earlier records, delete existing records or convert every journal into a protected company-managed entry. Required video, identity verification, billing and other functional services can still process data. Protection also cannot prevent someone from reading an unlocked screen or a PDF you have already downloaded.
6. Check your setup and daily workflow
First-time setup checklist
- Sign in personally in the web app and select the correct commission.
- Check your journal privacy setting; keep sending journal contents paused for this workflow.
- Set up the private passphrase in the isolated viewer and save the recovery kit privately.
- Confirm registration before the external custodian creates your protected copy.
- Review, finalize and reopen a synthetic practice entry; verify the complete content.
- Lock the viewer and confirm the decrypted content disappears.
Daily workflow checklist
- Check the correct account, commission and expected incoming references.
- Use Entry Details and View company record to inspect source details. Protected-copy viewing is optional; it is not an extra Finalize requirement.
- Review every selected exact version; choose Finalize or Reject in NC.
- Read per-entry results and resolve failed finalizations. Escalate pending PDF archival to the integration operator; do not repeat finalization to trigger delivery.
- Confirm finalized entries in Journal; retrieve/download only the copies you need.
- Relock, close sensitive windows and store downloaded copies safely.
7. Resolve personal setup and entry problems
Continue setup reports an unavailable backend
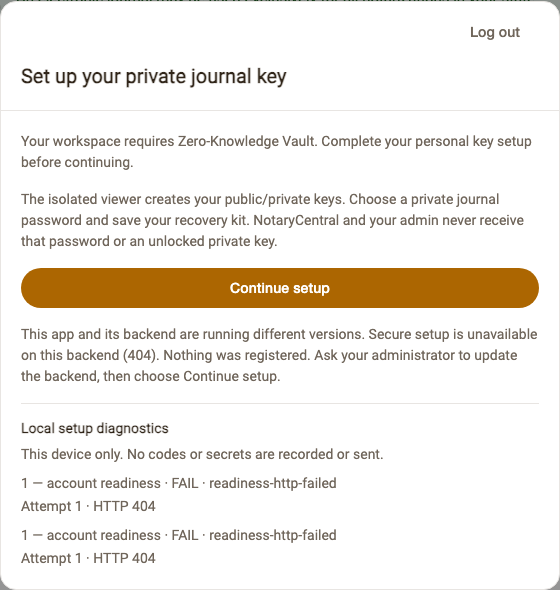
If the dialog says the app and backend are running different versions (404), nothing was registered. Ask your administrator to connect the app to its matching backend version, then choose Continue setup again. This is not a statement that you lack admin permissions, and changing the Vault switch will not repair the connection. Do not enter a password into a blank preparation window.
The viewer or external custodian window does not open
Finalize selected checks your account within NotaryCentral and resumes automatically after any required verification. It does not require opening a protected viewer. For optional protected-copy viewing, allow the expected window for the trusted viewer and open it from your own NC entry. Enter account verification only in NotaryCentral and your journal passphrase only in the isolated viewer. A sign-in or authorization error is not proof that MFA enrollment is missing. Confirm unfamiliar addresses with your integration team before entering secrets.
No enrolled key or no draft received
Complete private key setup and wait for Protection key registered. Ask the external custodian to confirm the assigned notary and entry/version, then refresh company-managed drafts. Enrollment must happen before protected creation; it cannot silently protect an old plaintext demo record.
Wrong password, missing copy or verification failure
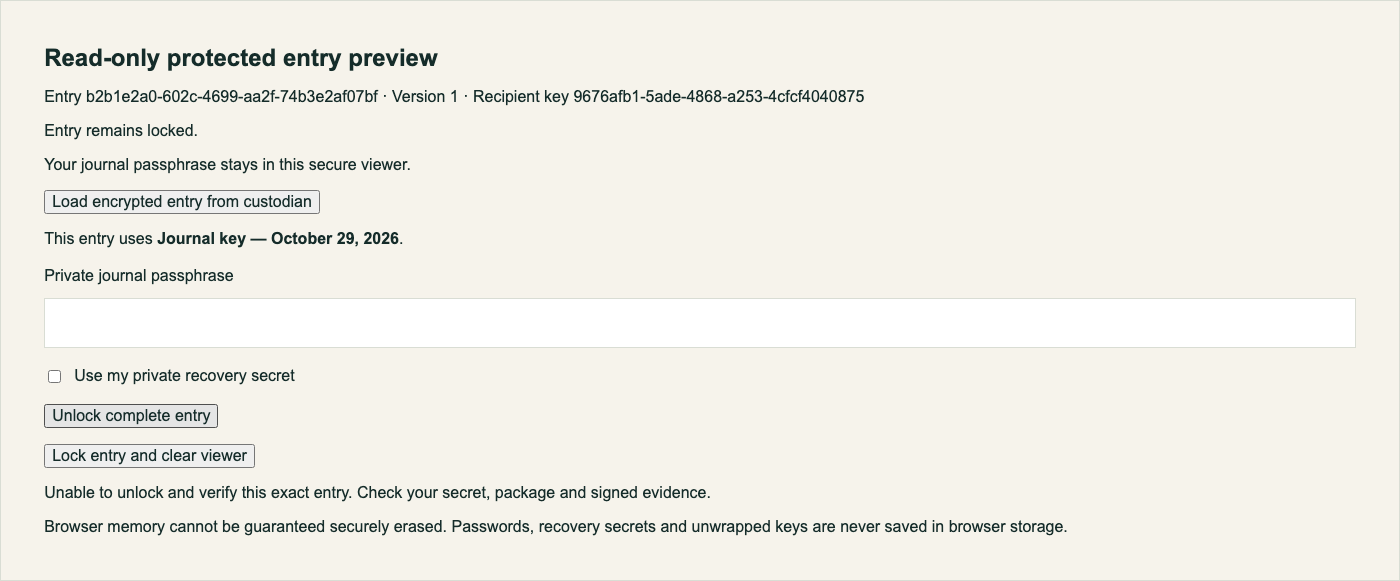
Check the intended account, entry and recovery material. An unlock failure can mean a wrong secret or an incorrect, unavailable or altered package. Do not treat it as safe to finalize or trust an unverified export. Ask the external custodian to check the exact source version and protected copy without sending your secret.
Walkthrough image: wrong password leaves the entry locked
An entry changed or only part of a batch finished
Refresh Drafts and Journal and inspect each result. Review a changed version before making a new personal decision. Successful rows stay finalized; failed finalizations remain drafts. For pending company PDF archival, the integration operator checks the failed processing step and retries the same receipt/version. A completed webhook HTTP response alone does not prove the PDF is stored. If a finalized record is missing from the list, check commission and date filters.
If the protected workflow itself is missing, ask your administrator to check workspace and access readiness.
Get help without sharing journal secrets
Share the entry/order reference, version, time of the problem, the action you took and the non-sensitive error wording. A cropped or redacted screenshot of status information can help. Remove signer names, addresses, identification details and document contents. Never send your journal password, recovery kit, private keys, account passwords, sign-in codes or a complete journal export unless an appropriate authorized secure support process specifically requires the record itself.
For general journal setup, continue with Quick Setup Guides or Journal Training. This guide describes the protected company-managed workflow; it is not a blanket legal-compliance certification.